Posts Tagged ‘re-do’

Ding Dong!

August 4, 2017

On Wednesday, my pilot husband left for flight safety for five days. Last time he was gone, a crew of my homies came and helped me re-do our bedroom and bathroom, including, but not limited to painting walls, furniture, light fixtures, moving furniture, and bringing in new blinds, towel bars, bedding, curtains, lamps, towels, etc. It is sublime. Truly. The oasis I’ve always dreamed of having.

This set of five days, I calmed the heck down and decided on installing a new doorbell. Assuming this would be a 15 minute job, I didn’t start til Thursday. Seriously, look how easy these instructions are! Remove! Connect! Mount! BAM!

20663441_10154617782871962_1807026797_o

You see, our doorbell has not chimed it’s beautiful song to signal the arrival of guests for approximately six years. It wasn’t real high on our to-do list, clearly. Here is the old doorbell in all of it’s fake brass glory with three-year-old stickiness from tape that held the sign, “Knock Loudly.” So classy, us Clampetts.

20641483_10154617782896962_2001927178_o

This was my first attempt at changing a doorbell, but I consider myself quite handy. (Please see previous posts of my success building chicken coops and installing a water filter in the fridge.)

Standing in the doorbell section of the local hardware establishment, I found a little cheapy button replacement and figured I could scrub and spray paint the vintage brass circle then install the new button. Lo and behold, the little nonfunctional button pictured above was not removable.

Back to the hardware store for a classy black doorbell with it’s own lighted button for your nighttime pushing pleasure. Now it’s Friday. Rick comes home on Sunday. (Please note the paint on my hand……..)

20629240_10154617782456962_101877321_o

After removing the dead doorbell, I realized that the new doorbell was smaller in size than the ghastly brass number. AND our house was just painted two weeks ago so the old dismal peachy-tan color stuck it’s tongue out at me all the way around the classy new job.

20641922_10154617782361962_1368792805_o

Locating the mammoth paint drum was the easy part of touching up the paint around the doorbell cavity. Upon setting down the paint pail in front of the doorbell location I noticed the easily-removable, small plastic lid on the giant lid. Perfect! It popped right out with a simple tug, but the paint was a good 15″ below the top. Even with my 16″ paintbrush it wasn’t going to fly. I snapped the little cap back in place and tipped the paint drum upside down to coat the inside of the little cap. Worked like a charm! Using the white cap as my pallet, the paint job was completed in three quick minutes. BAM!

20642191_10154617781876962_1012653535_o

As I forced the little cap back into it’s hole, realization hit that it splatted paint the first and second times I closed the paint…. and the little white dots were waving at me from my turquoise pants. Hurrying to the kitchen sink, I grabbed a rag and scrubbed and scrubbed until there was no further paint removal progress happening. Favorite turquoise pants are now spotted painting pants.

20663105_10154617782461962_783328004_o

Remember the paint on my hand? … Below is evidence of where it transferred to the kitchen rag cupboard door.

20641192_10154617781361962_641216435_o

After the paint dried and my pants dried to a nice polka-dot look, the doorbell was installed. Sweet victory! Tonight I went out the front door to take a gander at the lighted up Cadillac version of a doorbell on our front porch. It sort of has a calming Close Encounters glow to it, doesn’t it?

20676814_10154618764721962_934488574_o

Time tally:  two trips to the store, 1.5 hours. Removing old doorbell and gathering tools, 15 min. Scrubbing spiderwebs away from the hole with an old toothbrush, 5 minutes. Locating, shaking, opening paint, 10 min. Painting, 3 min. Scrubbing pants, 11 min. Cleaning paintbrush, porch, kitchen cupboard, feet and shoes, 18 min. Installing new doorbell, 4 min. BAM!       TWO HOURS THIRTY SIX MINUTES.

Remove! Connect! Mount! LIES!

Living Room Make-Over…. TA DA!

December 24, 2014

We painted our entry, front room and stairwell a brown-paper-bag color nine-and-a-half years ago.  I figured out I didn’t like the poopy color before it was dry….. but there it hung for almost ten years. I was swayed by popular color choices… earthy tones and textures… that I never really liked.  They were just IN. I’m not sure why being IN was a concern for me… it’s never been before. It was a dumb decision, but it is now in my past.

KONICA MINOLTA DIGITAL CAMERA

???????????????????????????????

For more than five years I have dreamed of having a light turquoise room in our home for my own eye candy privilege. There’s something delicious about turquoise. To say that I love turquoise would be an understatement. Turquoise is the color of the ocean and Lake Tahoe and Greece and Colombia… all of my favorite places. Those who know how to decorate and coordinate have cautioned me that it could look like a little boy’s room… and quite frankly I don’t care. I just love turquoise. So there.

2014 was a hard year for me. I have not fully recovered from the March 2013 car accident and then my big slip-in-the-mud-cut-my-knee-open episode in October slowed me down even more. Constant low-grade pain wears on you! I didn’t do a creative thing in all of 2014… and creativity makes me happy. I needed some happy. So, in the dark of the night, when Mr. Wallet had his belly full of Mexican food and he was half asleep, I asked if we could paint the living room. He said YES! What he didn’t realize was that “Paint the Living Room” = “Get New Furniture and Wall Decore and Get Rid of EVERYTHING in the Living Room”.  Heh heh heh….and the scheming preparedness began.

???????????????????????????????

The scouring of magazines commenced. The collection of paint cards grew. The measuring of furniture and walls happened. And then Mr. Wallet escorted me to the paint department of Lowe’s.  Be still my turquoise-loving heart. Painting began.

painting 002

painting 004

???????????????????????????????

Second-hand furniture shopping began for end tables. Then painting furniture commenced.

DIY front room 013

A fabric painting tutorial was watched and then BAM, I was painting fabric like a pro.… an unskilled, untrained pro.

DIY front room 005

And more projects were found and purchased at Goodwill.

DIY front room 011

The entryway was completed first. I was still in hot pursuit of a white couch for $25… well, not exactly but real close. Mr. Wallet likes a good deal.  A REALLLLL good deal.

entry 002

Finally, last night, the white couch from my dreams appeared in my turquoise living room and all is well in my world. Merry Caribbean Christmas to me!

living room daylight 002

The maps behind the French doors are my favorite. Their order, however, caused some stress for my 10-year-old nephew as they are not all on the same scale and they are definitely NOT in the correct places. He stood there in shock and disgust….”Auntie Linda, Mexico is NOT under England. And the Philippines are WAY too big and shouldn’t be at the top.” His tone implied, “I thought you were a teacher!” I tried to explain that I picked the maps for COLOR… I like turquoise, remember! And I randomly placed them… because I had to do it from the backside. I did make sure the important places are all accounted for: Canada, USA, Colombia, Maui, Greece and the Mediterranean Sea.

Every morning I descend the stairs and I smile. Thank you, Mr. Wallet.

Painted FABRIC… oh yes!

November 16, 2014

Here is the tale of the ugly bench that is now the darling bench.  I’ve read for many years about painting fabric to re-do furniture.  I finally jumped in with both feet and finished my first of many painted fabric projects. Feast your eyeballs on what I started with… the ugly bench.

DIY front room 001

Maroon and orange… who thought up that mess?  I researched many types of mediums to use and this one seemed the most economical and straight forward to mix and use.

DIY front room 003

That white bottle is Martha Stewart’s tintable fabric medium. They are $5.99 at Michael’s so use your 50% off coupon! I used two kinds of paint, just because I already had one… the Valspar “Aqua Ocean” sample and the Craft Smart cheap turquoise. The mixture is one part Martha’s medium to two parts paint. I used up two bottles of Martha’s mixture and probably have 1/4 of the paint/medium left over.

DIY front room 004

One trick I read that sure worked well was to spray the whole piece once over with water before each coat of paint. It helped the fabric absorb the paint.

DIY front room 005

I taped off the wood with masking tape. Not the best results.  Next time I will use blue painter’s tape. Here are the results of one coat of paint:

DIY front room 009

After the first coat of yummy turquoise dried over night, I sanded the whole thing with sand paper.  Yes, you read that right.  It turned the crunchy hard fabric back into nice soft fabric. I sanded between each coat after it was thoroughly dried. It took four coats of paint to completely hide the maroon color.

DIY front room 025

Here is the half way finished bench in our entry way… the fabric is done, but I still want to paint the wooden arms and legs, but I can’t decide on a color, and people were coming over… so there is sits.  My littlest one is so excited because she asked if one of those baskets could be ONLY hers for her shoes and whatnot… I said yes.

DIY front room 022

This makes me happy.

One Step Forward….

November 8, 2014

…Two Steps Back.  That has been my week.

KONICA MINOLTA DIGITAL CAMERA

BEFORE…. please stand by for AFTER.

The walls in our entry, living room, dining room and stairwell have been brown for 9.5 years. I realized I didn’t like the color the DAY we painted it on the blinkin’ walls. A re-do was definitely overdue times 10, so a misty mountain light turquoise color was chosen and has been applied to the x-brown walls…. in two layers, unfortunately. The only area not complete is the stairwell. It’s my nemesis at the moment. I am highly distracted by EVERY other thing possible so I don’t have to conquer the stairwell til I’m ready… like washing windows, shopping for new lamp shades, painting baskets, searching for treasures around the house to move to their new place in the misty mountain terrain.

Monday: Figured out we need DOUBLE the paint amount…bummer. Back to Lowe’s.

Tuesday: Sanded three layers of paint from my darling DIY end tables in an attempt to make them look rustic… and I hate it. Starting over. Need more paint… again. Back to Lowe’s.

Wednesday: Shopping for a bench, couch and ottoman…. came home with three velvet pillows, two turquoise and one orange.

Thursday: In trying to re-hang the curtains, 3 of 8 wall screws with supports were pulled from their resting places, leaving large holes…. filled the holes. Need larger supports and bigger screws. Back to Lowe’s.

Friday: Shopping for a bench, couch and ottoman… came home with two gorgeous lampshades.

Saturday: Climbed up the ladder to clean the dining room hanging light. All cleaned… then I screwed the gigantic light bulb back in and the glass bulb separated from the metal screwing part…. back to Lowe’s.

Some day, hopefully in November, I will share the after pictures of the misty mountain oasis in the Sonoran Desert. The real story would be the daily pictures of me wearing painting clothes and not swearing. Sheesh.

The Old has become New

January 6, 2012

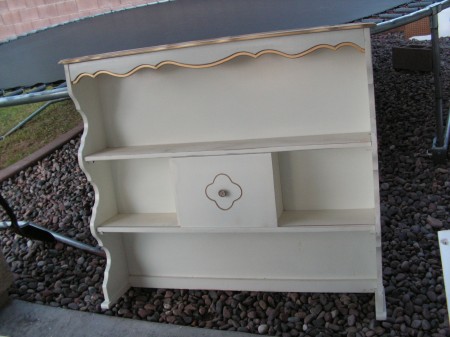
Remember back in April when I spent all my birthday money at Goodwill on 50% off day with visions of a shabby chic backyard?  Well, it is slowly materializing!  Finally!  I found this top from a girl’s bedroom set… maybe from the bed or a desk hutch… and I could envision a garden shelf dealie to stack my pots and hang my tools.

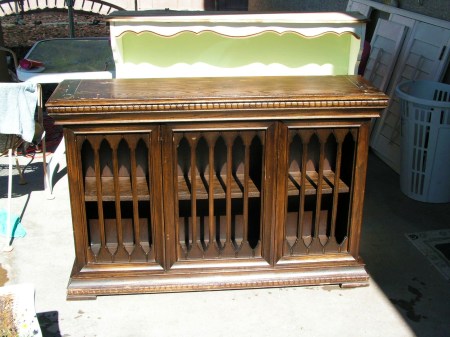
Then I looked for MONTHS for a bottom piece to store my dirt and fertilizer and turtle kneeling pad.  I think it was in August or September that I happened on this gem at Goodwill… on another 50% off day!  Sweet mother of baby Jesus!  It was perfect.  The guy at the store told me that it came in from a monastery full of religious books all in Chinese.  So half of the finished product was in the ministry.  :o) 

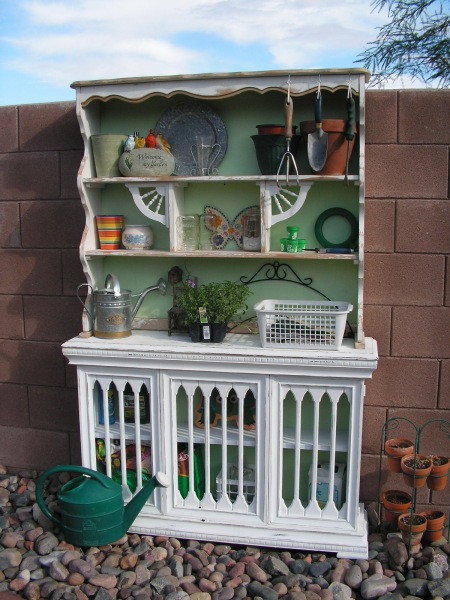
After much painting and sanding and hammering 1×4’s on the back so it doesn’t fall and kill a small child or dog… it is finished!  My husband took one look at the finished product and asked, “So you had all that junk?”  Nice, eh?  Yes, I did… and one man’s junk is his wife’s treasure.  I actually will use the junk, well, most of it.  The ceramic butterfly in the center was handmade by my six-year-old self in Renton, Washington in a ceramics class at a neighbor’s house.  The rest is truly junk.  Not the butterfly.

We did have a near catastrophe whilst waiting for the 1×4’s to be nailed on the back.  I had it set up in the middle of our back porch… clearly capable of falling and killing a small child or dog.  The wind whipped up a gale to behold and knocked the top right off.  It fell backwards, hit the NEW, glass patio table, got a big bash-in on the back piece and fell to the ground.  Shoot.  I put the big tin plate on the top shelf in front of the bash-in evidence.  All is well now.  Why would anyone need this in their yard, you ask?  Because now my gardening gloves won’t get chewed and buried by the dogs.  That’s really what this was all about…. me having to repeatedly replace my flimsy gardening gloves from the dollar store.  See, all is well now. (I have since planted those violas in those six pots in the little green stand on the right.  They are darling.)